Use your QCC badge
The Queen City Con badge is a MeshCore companion radio. Every badge runs the same firmware, but not every badge has the same parts, so what yours can do depends on what is fitted. Pair it with the Offband client on a phone or computer, and with a screen you can use it on its own too.
Applies to
The QCC badge firmware, on every badge. Needs firmware newer than offband-v1.6.0-beta1.
What your badge has
A supporter badge has a screen and a keyboard. A pyramid badge has neither unless one was added, and some badges have no buzzer or GPS.
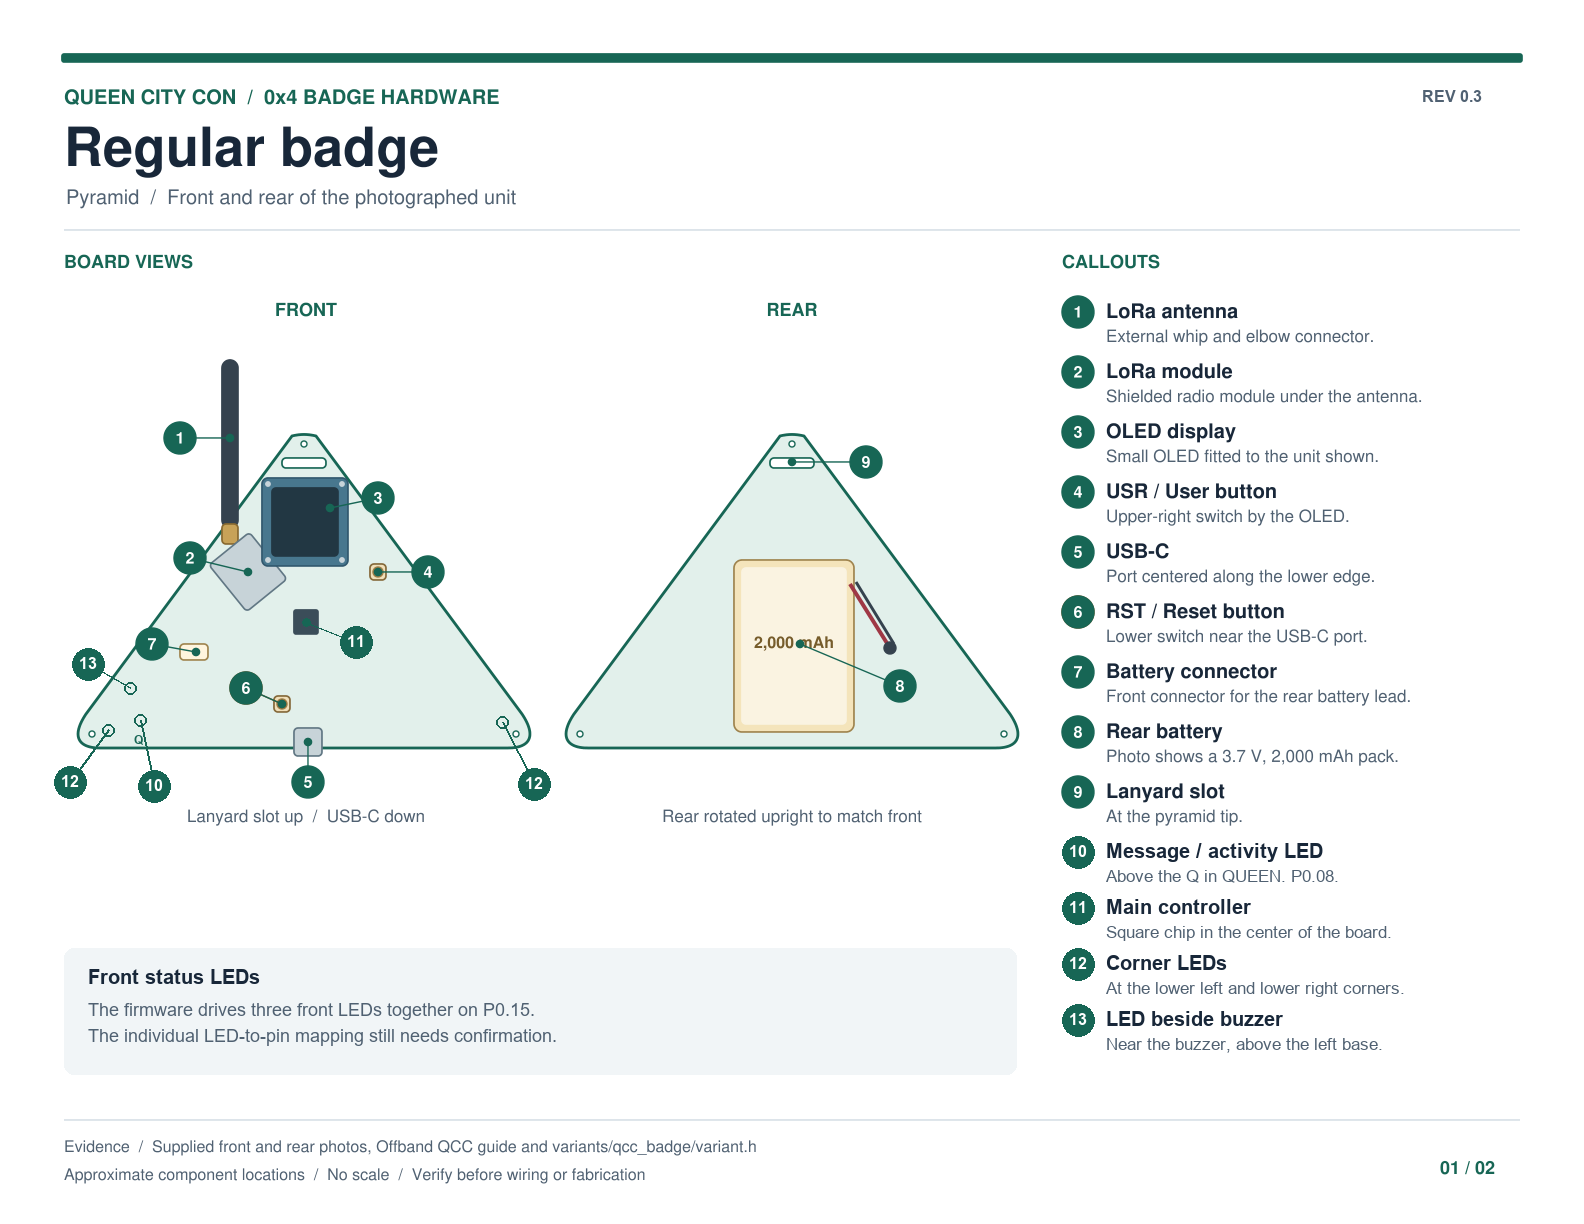
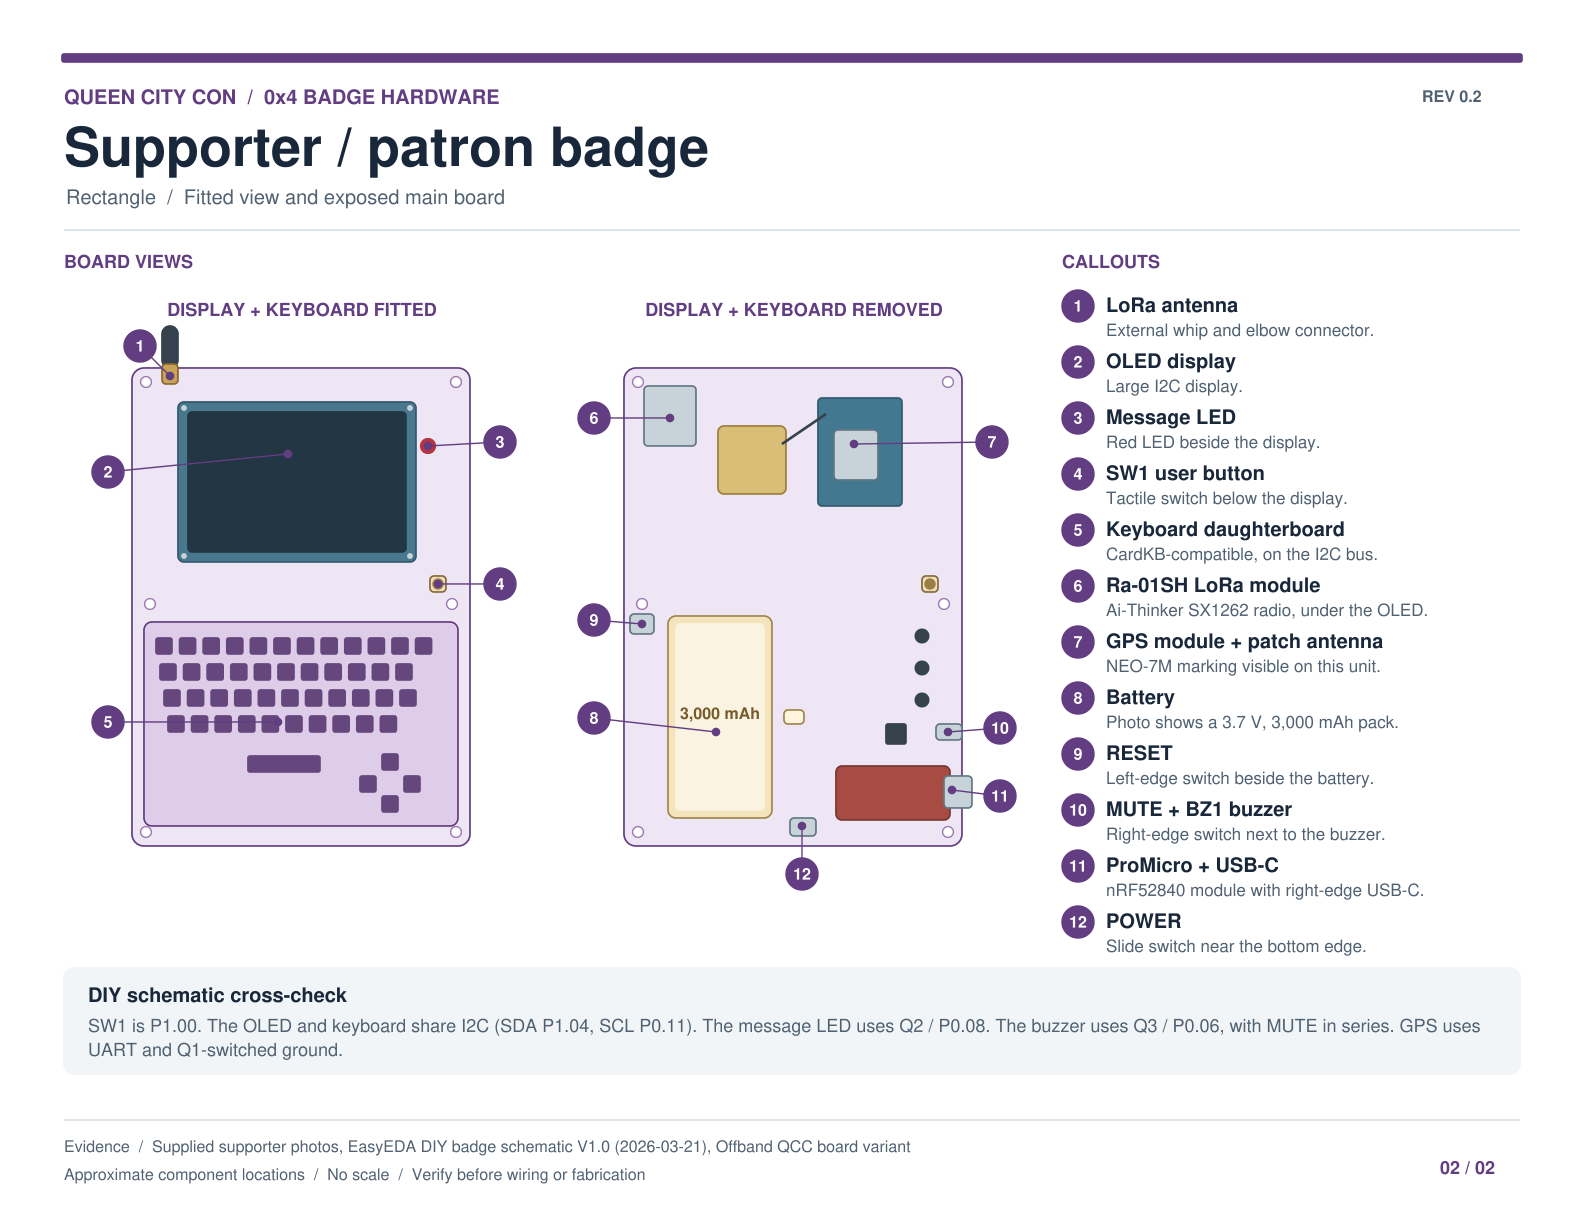
Part positions are approximate, and parts fitted to your badge may differ: the pyramid shown has a screen added. The button this guide refers to is marked USR on a pyramid badge and SW1 on a supporter badge. For the circuit boards and every part on the badge, with its value or part number, see the QCC badge parts list.
| Part | If it is fitted | If it is not |
|---|---|---|
| Screen | Read messages and change settings on the badge. The Bluetooth PIN is on the screen and changes every start, unless you set a fixed one. | Do everything from the client. The Bluetooth PIN is 123456 until you set your own. |
| Keyboard | Type and send messages on the badge. | With a screen, the button drives the badge and you send messages from the client. |
| GPS | See step 8. | The badge has no position of its own. With a screen, the GPS page says No GPS Module. |
| Buzzer and mute switch | The badge plays tones. The switch cuts the buzzer in hardware. | The badge makes no sound, whatever the tone settings say. |
The badge finds its own parts, so there is nothing to set up. It looks for a screen and GPS when it starts, and keeps checking for a keyboard while it runs. It can't tell whether a buzzer is fitted, so it plays tones either way.
Steps 3 to 11 use the badge's screen. Without one, go from step 2 to step 12. Steps 5 and 6 still describe your badge's defaults, and step 8 explains the GPS modes you can choose from the client.
Before you start
- Charge the badge. Its battery bar reads 0% at the voltage the badge will no longer start from, so a badge at 0% may still be running, but it will not boot.
- For pairing, download the Offband client.
- If your badge has a mute switch and you hear nothing, check the switch first.
Steps
1. Turn it on
With a buzzer, the badge plays a short tune when it starts. With a screen, it shows the Queen City Con splash screen for three seconds, then opens the Messages screen.
A new badge names itself QCC- followed by four characters, for example QCC-E7A1.
Those four characters match the label on your badge, so you can tell your badge apart
from the ones around you. You can rename it from the client.
2. Pair with the Offband client
With a screen:
- On the badge, open the Status screen (see step 3).
- The bottom line shows
BT pinand a six-digit number. - In the client, connect to your badge by its name and enter that PIN.
The badge picks a new random PIN every time it starts, unless you have set a fixed PIN from the client. If pairing fails after a restart, read the PIN again.
Without a screen:
- In the client, connect to your badge by its name.
- Enter
123456.
Every badge without a screen starts with that same PIN, so set your own from the client. A new PIN takes effect the next time the badge starts. Write it down: the badge has no way to show it to you, and if you lose it, a full erase is the only documented way back, which also removes your channels, settings and identity.
3. Get around
With a screen and no keyboard, the button does everything:
| Press | What it does |
|---|---|
| Click | Next |
| Double click | Previous |
| Long press (about a second) | Open or select |
| Triple click | Back. On the Messages screen it turns the buzzer on or off instead. |
If the screen has gone dark, the first press only wakes it.
The four main screens are Messages, Contacts, Nearby and Status. When you change screen, a strip at the top names the four and shows where you are.
Without a keyboard, the button moves between the screens first and goes into a list only when you ask it to. On Messages, Contacts and Nearby:
- On the screens, a click goes to the next screen and a double click to the previous one. No row is highlighted, and the strip that names the four screens stays at the top.
- A long press goes into the list, at its top row.
- In the list, a click moves the highlight down and a double click moves it up. A long press opens the highlighted row.
- A double click on the top row goes back to the screens.
Status has no list, so a long press there opens Settings.
In a conversation, a single click or a triple click goes back. In Settings, a click and a double click only move within the list, and a triple click goes back.
With a keyboard:
- Up and Down move the highlight; Left and Right change screen.
- Enter opens, selects or sends; Esc goes back.
- Fn+S opens Settings from anywhere.
- On Messages, Contacts or Nearby, just start typing to reply to the highlighted row.
- The button still works, and on the main screens a click changes screen.
4. The screens
- Messages lists your conversations, unread ones first, then the most recent. The title shows how many are new. A new message flashes its row and wakes the screen when no phone is connected.
- Contacts marks a contact
stalewhen nothing has been heard from it for three hours or more. - Nearby lists what the badge has heard in the last hour:
@a person,^a repeater,&a room,*anything else, including a node that is not in your contacts. - Status shows your name and node, how many nodes were heard this hour, the radio settings, the battery, packet counts and the pairing PIN. A long press here opens Settings.
The small LED next to the display flickers when packets arrive and blinks while you have unread messages.
5. Default channels
A new badge comes with these channels:
| Channel | Notes |
|---|---|
| Public | always there; it can't be removed |
#queencitycon |
the conference channel |
#okimesh |
|
#test |
silent by default |
#echo |
silent by default |
#offband |
|
#qcchhv |
|
#qcchams |
#test and #echo make no sound, not even for a mention, until you change them.
These channels are only added to a badge that has none. Once you have channels of your own, updating the firmware keeps them exactly as they are.
6. Default radio settings
A new badge starts on 919.5 MHz, 500 kHz bandwidth, spreading factor 7, coding rate 5, 22 dBm.
These settings are chosen to keep Queen City Con separate from the local mesh, so the convention traffic does not overload the local mesh and the local mesh does not overload the convention. After the con, change them in the client to your local mesh's settings for everyday use.
Like the channels, these apply only to a new badge. A badge that already has radio settings keeps them across a firmware update.
7. Sounds and notifications
Open Settings, then Tones.
- Sound chooses what makes a noise: All, DMs + @ (direct messages and mentions only) or Off. Off also mutes the buzzer. Out of the box it is DMs + @, so a busy channel does not make the badge chirp all day; a channel you want to hear everything from is set per channel, below.
- One row each for DM, Channel, Room, New contact, Ack and Sent picks the tone for that event. The tones are Silent, Chime, Kerplop, Tick, Bloop, Drop and Knock, and the picker plays each one as you move to it.
- Out of the box: DM is Chime, Channel is Kerplop, Ack and Sent are Tick, Room and New contact are silent.
- A tone for one channel: with a keyboard, open the conversation and press Right. Without one, set it from the client.
- Whether one channel makes a noise at all: with a keyboard, open the conversation and
press Left. Each press moves to the next setting and the badge shows which one:
Default (follow the Sound setting above), All, Mentions (only when someone
writes
@[your name]) and Off. Without a keyboard, set it from the client.
Right is what a channel sounds like; Left is whether it sounds. A channel left on Default follows Sound, so changing Sound still moves every channel you have not touched. Off on one channel silences it even when Sound is All — and Sound set to Off silences everything regardless of any channel's own setting, because asking for silence should give silence.
The setting belongs to the channel, not to the badge: set it here and the client shows the same value, set it in the client and the badge shows that. There is only one of it. - Custom holds up to eight tunes of your own. With a keyboard you can type them; without one, fill them from the client.
A triple click on the Messages screen turns the buzzer on or off without changing any of these settings.
8. GPS and power saving
Open Settings, then GPS. The mode cycles Off, On and Power save.
- On keeps the GPS running. It finds and holds a position fastest, and uses the most battery.
- Power save looks for a fix for up to three minutes the first time and 90 seconds
after that, then rests for an hour once it has one. If it keeps failing to see the
sky it backs off, waiting longer after each failure, up to eight hours. The screen
shows
next try in …, orno sky; next try …while it is backing off. - Choosing the mode you are already in makes it try again straight away.
The GPS screen also shows the fix, position, altitude and time. When it has a fix, it can suggest your time zone.
9. Screen
In Settings:
- Nav text and Message text each choose large, medium or small.
- Screen off turns the screen dark after 15 seconds, 30 seconds, 1, 2 or 5 minutes. The default is one minute.
- Time zone shows the zone in use and, with a GPS fix, the zone the GPS suggests.
From the client you can also:
- set the display to stay on, or to stay dark;
- turn the screen upside down — rotation is either 0 or 180 degrees, and it sticks across a restart. There is no rotation control on the badge itself.
10. Battery
Settings, then Battery, shows the battery voltage and the voltage the badge treats as 100%.
- The badge learns its own 100% point after a full charge.
- Set 100% here sets it now, if the badge has been fully charged.
- Back to auto returns to the learned value.
When the battery runs very low while the badge is on, it turns off, showing Low Battery. Shutting Down! if it has a screen. It only does this after the voltage has stayed low for five minutes, and never while it is plugged in.
If the battery is too low to start, the badge will not boot. An LED blinks SOS, any screen goes blank and the badge goes to sleep. Charge it: the badge starts again by itself once the battery has recovered. Pressing the button makes it try again sooner.
11. Hibernate
Settings, then Hibernate, turns the radio and the screen off until the badge is next reset. It asks you to confirm first. Hibernate clears the messages stored on the badge.
12. Set it up from the client
The Offband client can change most of the badge's settings, and on a badge with no screen it is the only way to change them:
| Setting | On the badge | From the client |
|---|---|---|
| Sound (All / DMs + @ / Off) | with a screen | yes |
| Event tones | with a screen | yes |
| A tone for one channel | with a screen and keyboard | yes |
| Custom tunes | with a screen and keyboard | yes |
| GPS mode and Power save | with a screen | yes |
| Text sizes, screen off, time zone | with a screen | yes |
| Display always on or always dark | no | yes |
| Screen rotation (0 or 180 degrees) | no | yes |
| Battery 100% point | with a screen | yes |
| A fixed Bluetooth PIN | no | yes |
| Bluetooth on or off | with a screen | no |
Check it worked
- Pairing: the client connects. With a screen, the Status screen footer changes from
BT pintophone connected. - Sound: with a buzzer, move through the tone picker; each tone plays as you reach it.
- Radio: the Status screen shows the frequency, spreading factor and bandwidth in use.
- GPS: the GPS screen shows a fix and a position.
Troubleshooting
- No sound: not every badge has a buzzer. If yours does, check the mute switch, then Settings > Tones > Sound, then whether a triple click on Messages has turned the buzzer off.
- Pairing fails, with a screen: the PIN changes each time the badge starts. Read it again from the Status screen.
- Pairing fails, without a screen: the PIN is
123456, unless someone has set a different one from the client. See step 2 if it has been lost. - My channels did not change after an update: that is intended. The default channels are only added to a badge that has none.
- GPS never gets a fix: it needs a view of the sky. In Power save it waits longer between tries the longer it goes without one; choose Power save again to retry now.
- Bluetooth is off and I can't connect: turning Bluetooth off on the badge lasts until it restarts. Restart the badge.
- It won't turn on and the LED blinks SOS: the battery is too low to start. Charge it, and it starts by itself once the battery has recovered.
Limits and recovery
- The badge has no brightness setting.
- Without a keyboard, per-channel tones and custom tunes need the client.
- Without a screen, the button has no menu to drive, and turning Bluetooth off isn't available.
- Hibernate deletes the messages stored on the badge, and that cannot be undone.
- Updating the firmware keeps your channels, radio settings and identity. A full erase does not: it removes them, and they cannot be recovered afterwards. Follow installation versus update before reflashing.